Wow, it's been quite a while since I Blogged last. Frankly, with the drought I haven't really had much to blog about. Now the rains have returned bringing my renewed ambition. I'm not gardening this year but I do have a nice fenced in garden spot that I am building up for raised beds next year. Our soil is horrible here so raised beds are going to be necessary. I have a large pile of last years manure and straw so far which will be mixed with top soil then spread and tilled. Then bricks or 2x4's will be used to create beds. I'm pretty confident that I will be a happy gardener next year.
Our 4 grape plants are finally growing this year and look very healthy. We watered them all summer and built cages around them to keep the deer from eating them again. I am extremely excited to see that we also have a few Elderberries in heavy flowering mode right now. Fresh elderberry syrups and tinctures will be so yummy! And perhaps next year...elderberry wine!
We have a few tomatoes and a few herbs to play with this year and of course, the new garden bed to build. There have been a few other changes around here but I'll leave those for future blog posts.
Sunday, June 9, 2013
Mobile Blogging!
Wednesday, January 4, 2012
More Home Made Health and Beauty Recipes
Home Made Toothpaste
2 tablespoons Coconut Oil (a base)
1 tablespoons Baking Soda (alkaline low abrasive cleanser)
2 tablespoons Calcium Carbonate (alkaline low abrasive cleanser that aids remineralization of teeth)
½ teaspoon xylotol (natural sweetener and aids remineralization of teeth)
5-10 drops Essential oils such as orange, spearmint or cloves. These are good alone or as a blend.
I’ve been playing with this recipe and ground up a couple tablespoons of fruit flavored Tums. It tastes yummy however; the Tums were very hard to grind in my coffee grinder so calcium carbonate capsules will be my next option.
** xanthan gum or corn starch are good additions to thicken or you can simply add more baking soda or calcium carbonate.
If you have dogs and are wary of using xylotol, you can also use stevia to sweeten. Stevia and xylotol help to reduce the formation of plague because the bacteria in your mouth can’t use either of these sweeteners as food. Therefore, the plaque acids they produce as waste are reduced by as much as 90%. The more alkaline environment also enables your teeth to make use of the minerals present in saliva to remineralize your teeth.
Saline Nasal Spray
Per one pint of distilled water, add ½ teaspoon of non-iodized salt and ½ teaspoon of baking soda. It’s just that easy.
I’ve been washing and reusing the saline nasal spray bottles I bought at the store. I pull them apart, wash them in hot soapy water, rinse very well, and put them back together with fresh water and then squeeze and spray into the sink for a good final rinse for the tube that does the spraying. Then I fill them with the same amount of saline solution they originally came with: 1.5 fluid ounces by weight on my digital scale. We have several bottles that I refill at a time so this works well for us.
Another great product you can make yourself is soothing and refreshing. Store this in a plastic container and keep in a cool dark place. You may be able to find a powder puff at a local department store.
1 cup Corn Starch
1 cup arrowroot powder
20 drops Musk perfume oil
10 drops Bayberry essential oil
10 drops Orange essential oil
Mix all ingredients in a bowl and then whiz in a food processor for about 30 seconds. Let this sit for a few days to allow the essential oils to infuse the powder. This particular essential oils combination is very soft and pleasant. Of course, single scents are also very nice.
Monday, January 2, 2012
Home Made Goodness
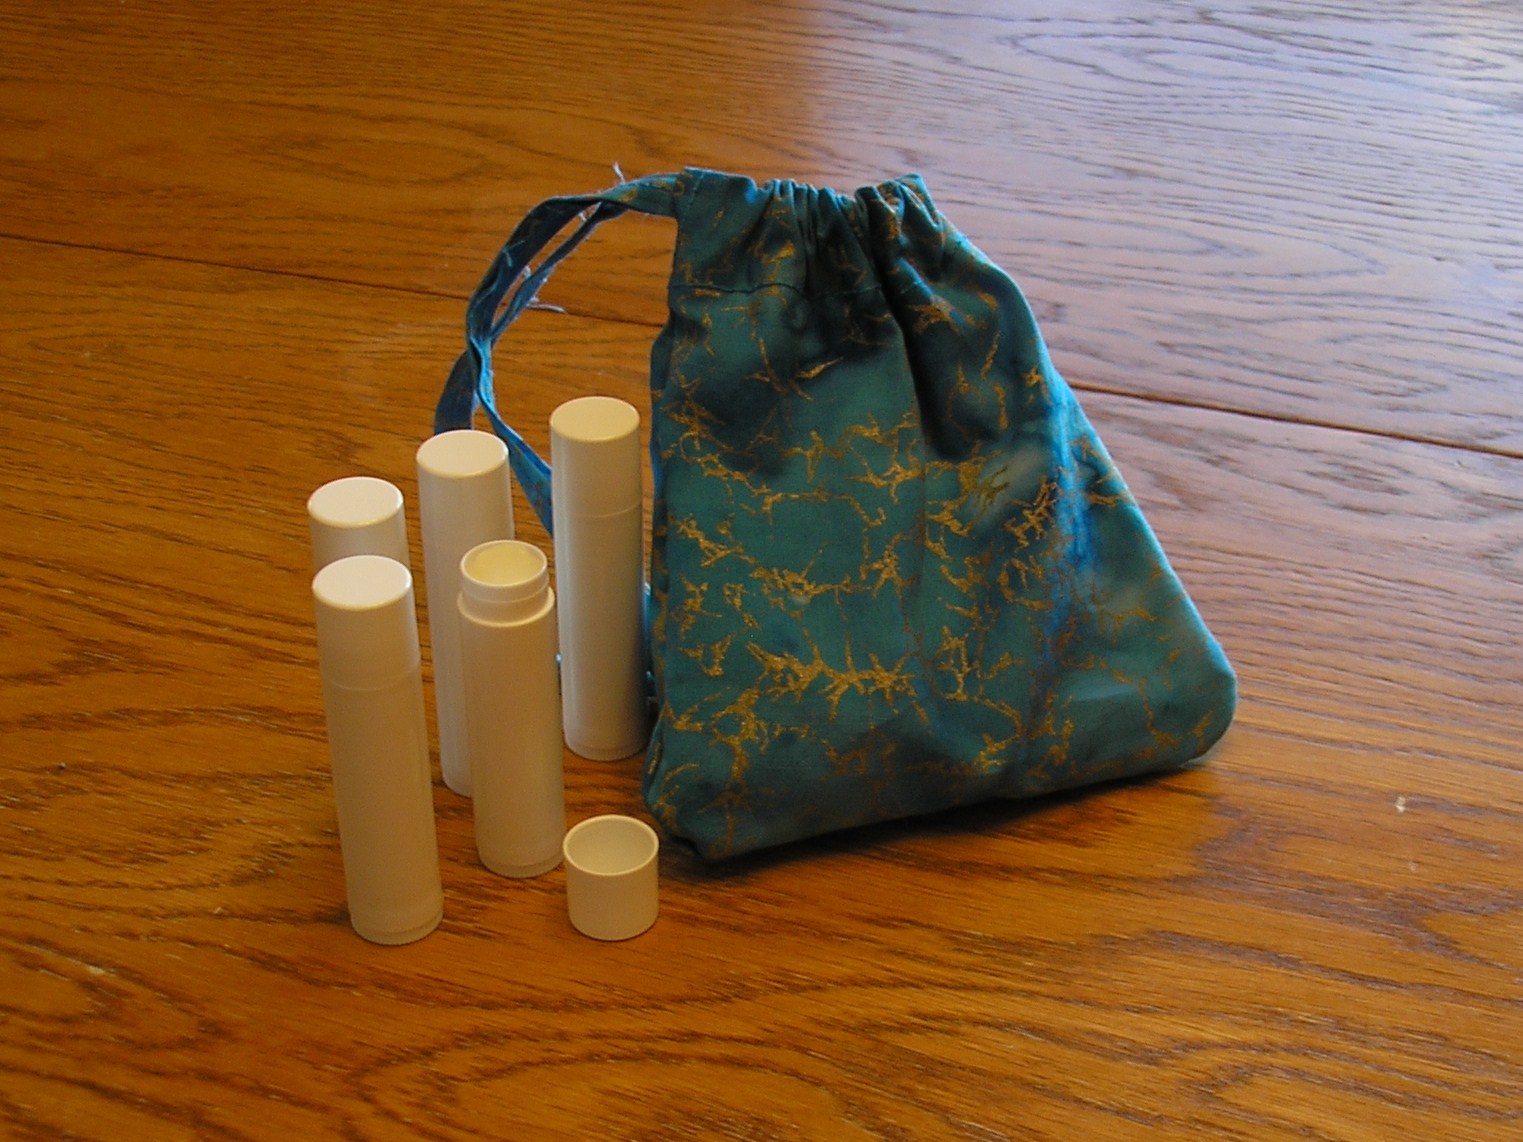
I love having productive days like today. I've been wanting a pouch to use for my my cell phone, blue tooth and iPod Nano so I can store them all together in my phone locker at work during the day. I can't take my electronics past the sally port at work as I work in a State Hospital. Procrastination has been my best friend of late, but we parted company for today at least, LOL! I made my pouch without a pattern or much knowledge of sewing for that matter. It turned out very well and will suite my needs quite nicely. After I finished that project I made some lip balm using coconut and sweet almond oil plus bees wax.The lip balm I have been using costs over 5 dollars each at the health food store and is made for sensitive folks that can't handle all the gunk that is in traditional balms.
What I made today has a nice mild coconut flavor because I used the raw coconut oil I have, so no need for essential oils that are irritating to my lips. I have been wearing it all day and it is absolutely divine and really lasts! Thankfully, I had lip balm tubes on hand as like I said earlier, I've been meaning to get these made but procrastination... well, you know. Here is my lip balm recipe for anyone to use.
Coconut Almond Lip Balm
1 Tablespoon Coconut oil (raw if you want it to taste like mild coconut)
1 Tablespoon Sweet Almond oil
1 tablespoon Bees Wax
2 drops Vitamin E from a from a capsule.
Melt all oils and bees wax together and take off the burner. Add the vitamin E and stir. You tubes or tins should be lined up and ready to fill before melting your ingredients together, so using a small funnel, carefully fill your containers. Let them sit until set and firm - they'll be opaque when ready to cap. It's so easy! I think if you want to use flavor or essential oils you would simply need to add a tiny bit more bees wax.
Tuesday, December 27, 2011
Soap Recipes
"Pound" Soap (Kathy Miller)
16 oz. canola oil
16 oz. coconut oil
16 oz. palm oil
16 oz. palm kernel oil
20 oz. soybean or olive oil
24-28 oz. cold water (lower for essential oils, higher for troublesome fragrance oils)
12 oz. lye crystals
Temperature around 110 degrees.
Sudsy All-Vegetable Soap with Palm Kernel (Kathy Miller)
20 oz. coconut oil
16 oz. palm oil
16 oz. canola oil
8 oz. palm kernel oil
24 oz. olive oil
24-28 oz. cold water (lower for essential oils, higher for troublesome fragrance oils)
12 oz. lye crystals
Temperature around 110 degrees.
"Almond Joy" / Chocolate Almond Swirl (Kathy Miller)
16 oz. palm oil
14 oz. coconut oil
52 oz. olive oil
6 ounces cocoa butter
32 oz. cold water (4 cups)
12 oz. lye crystals
Add at trace:
1 ounce Bitter Almond fragrance oil
2-3 T. cocoa powder blended into about 1/4 of the soap at trace (after pouring 3/4 of it into mold)
Temperature: 95-100 degrees
The Almond Joy is really yummy smelling soap. I tried to sell this soap but it wasn’t too popular so I used it all at home and it is fantastic! I just don't understand why it wasn't popular. If you look on Kathy’s site, listed at the top, you will see how great this looks swirled. And if you try it, you won't be disappointed!
I always superfat my soap 5% - 10% so I always check with a Lye Calculator to gauge how much lye I will need. I like to mix my lye solution and set it to cool in a safe place (away from the snooping noses of our cats). Then I heat the oils. Just as Kathy suggests I measure and melt the oils -minus the olive oil, then I add the olive oil and pull the pan off the stove. This helps to cool it down to 110 degrees quicker. If you melt them all together, it takes much longer for the oil mix to cool to 110 degrees. I’ve been adding approximately 3 ounces of fragrance oil or 4 ounces of essential oils to the first two recipes as well as a natural colorant such as paprika, when I reach trace. That seems to work for me. Both of these recipes make about 7 pounds of soap. With my block molds, I get 22, approximately four ounce bars.
Monday, December 26, 2011
Becoming More Self Sufficient
Much like a squirrel getting ready for winter, we are doing necessary things to prepare for a possible reduced income this winter. You know, It really sucks to think that we may very soon have only one income and, it really sucks to discover that the job market really is ‘’that bad’’. I suppose when life throws curve balls, you can either knocked down or catch the ball and play the game. Well, game on! So now, instead of just waiting for the “ax to fall” we are being proactive and trimming the fat from our monthly expenses. Whew, I could not believe just how much fat we needed to trim. To begin, we cancelled the XM radio in my car, cancelled our landline telephone, continued with using our 10 cents per minute Trac Phones and buying only nutritious foods at the grocery store. We are also keeping the thermostat turned down to about 69 degrees, burning as much wood as we can for heat and not using lights unless necessary. Ya know, that last one is the toughest thing to remember, LOL! I looked into using those nice Aladdin kerosene lamps for light, you know the ones like the Amish use, but oh my gosh, they are 2-3 hundred bucks apiece so that idea was a flop. Thankfully, we’ve been using florescent bulbs in the house for years so our wattage has already been reduced in that area.
I got to thinking about our meals and figured we could also save by preparing weekly or biweekly dinner menus instead of keeping a well-stocked pantry to prepare meals for whatever suites us on any given day. So now, we have been working very hard to stick to a grocery list related to those recipes. At the store, this also includes staying away from brand name items and grabbing the sale fliers on the way in. That is proving valuable in helping us to eliminate a lot of wasteful spending. In addition, I plan to begin baking bread and snack items at home, which will alleviate some of our food cost as well. Changing some of the things we use every day will also assist us in keeping our expenses down. Like I mentioned earlier we have already been using fluorescent bulbs but we also had energy star rated windows installed 2 years ago, only purchase Energy Star rated appliances and I at least, am driving a gas efficient car. Who knew that always thinking “green” could benefit us down the road as it is now!
I have not forgotten about our furred and feathered charges. We keep the cats warm in the garage at night during these Missouri winters by using an Infrared heater and we use infrared bulbs in the chicken coop and duck/goose house as well. Other things that really add up include making our own soap, my facial cleanser, facial moisturizer, toothpaste, saline nasal spray and lip balm. These things are very easy to make and cost pennies compared to buying them at the store. I believe the more self-sufficient we become the easier it will be to survive on one income if or when that need arises. I even boil water for tea on the wood stove!
I was recently advised “hope for the best and plan for the worst”. This has proven to be an immense day-to-day challenge. Since this post has developed into what we’ve been doing to prepare for the worst, I’ll share some of my recipes in a post in the next couple of weeks, for the things I make myself. In case anyone else might want to become more self-sufficient as well. Of course, if You have any recommendations, PLEASE leave a comment below. I’m pretty sure I haven’t thought of everything, LOL!
Thursday, December 15, 2011
My Zen of Soapmaking
There are so many reasons that I enjoy making my own soap. First of which is that I can control the ingredients that go in my soap. Chemicals that are common in store bought soap include heavy perfumes, BHT (a preservative) and Pentasodium pentetate (a chelating agent). These are ingredients that I find unnecessary and are not in the soap I produce. Heavy perfumes can be very irritating to skin so I use either essential oils or high quality perfume oils and in small amounts as to NOT cause irritation to my sensitive skin. I have used vitamin E as a preservative and additional emollient however; I often forget to add it. In an unintentional experiment, having forgotten the bars were in the cabinet, I stored several bars of my soap in my garage for 3 years, exposing them to heat in the summer and cold in the winter. I was so pleased to find that none of the bars turned rancid. The scent was faded but the quality was excellent. I also do not need to add a chelating agent as I use distilled water when I mix my lye solution. Chelating agents bind with metal ions in hard water and supposedly make soap foam better.
The soap formula I use makes a hard bar that is rich, moisturizing and offers a luxurious lather. It is also superfatted, which means the formula has excess fatty acids that do not match up with the sodium hydroxide (lye) molecules after saponification occurs. The excess fat remains in the soap and becomes a soothing moisturizer for the skin. Adding natural colors such as beetroot powder, paprika or spirulina and adding exfoliants such as oatmeal, cornmeal and poppy seeds are fun and add a Spa treatment feel to a bath or shower. I often do not use colorants as I have found that the essential oils or perfume oils tint soap a soft yellow or soft earthy tan and those tints look good on soap.
When people ask me about my soap, one of the first things they seem to stumble over is the fact that I use Lye. Once they understand the process, they are no longer apprehensive. The soap making method in chemical terms is quite complex however, simply put, the Lye molecules react with fat and oil molecules in a process called saponification to produce soap and a byproduct; glycerin. We all know that glycerin is good for skin. Soap making has become very popular and with technology, it is now easier to understand and learn.
I use either a Hot Process or a Cold Process for my soap making, but I tend to prefer the Cold Process because I feel more in control of the “process”. Hot Process progresses fast whereas Cold Process allows me to get into the Zen of the process and enjoy it. For me the Zen part is the stirring. I use a stick blender with a whisk attachment to slow the process and allow for a more complete mixing of the fats oils and the lye. While stirring I infuse Reiki healing symbols into the mix and this is where the Zen occurs. For me, making soap is quite a relaxing experience.

Notice the soft buttery yellow of this soap tinted with only the perfume oil added for a light scent.
Sunday, October 9, 2011
Should I Buy Mini Donkeys From A Sale Barn?
I went to the sale barn in Montgomery City Missouri yesterday with a friend that was selling some of her surplus chickens and ducks. I went with the hopes of finding some peafowl but none were brought in. I am also looking into mini donkeys but have been repelled by the $400 price tag I have found during my searches on the internet. Before the sale we went into the barn and viewed the livestock in the pens. We saw lots of cattle, a few gorgeous horses and several mini donkeys. Yay! this gave me an opportunity to get a good look as it's been a while since I've seen a mini donkey. I talked to one of the workers and he told me I could probably get one or more real cheap. So I looked as best as I could from my disadvantaged place outside the pen. The trio I liked were a pair and their colt. They looked real nice but I am very worried about buying from a sale barn. I didn't check their teeth or see them move since I was not going to be buying anything on that day. But this really got me to thinking.
We went back outside since the birds were being sold in the parking lot due to it being such a nice day. So, before we left we went back into the barn. Well, the trio I was looking at was now just the adult pair and they no longer wanted to interact with me or anyone else for that matter. Can't blame them, their colt was taken from them and they were no doubt, pissed! We asked the guy we talked to earlier how much these donkeys had gone for the night before and he told us between 15 and 50 dollars each. WOW! I need to do more research before the next sale because I intend to be there. I am absolutely in favor of rescuing a pair or a few mini donkeys from a sale barn, but I'm feeling a bit concerned about buying a pig at a poke, so to speak. So here's my question. If the owner isn't available, what exactly do I need to check for when buying pet mini donkeys at a sale barn? I sure hope someone will leave a comment and help me with this question as mini donkeys and sale barns are not my area of expertise.
We went back outside since the birds were being sold in the parking lot due to it being such a nice day. So, before we left we went back into the barn. Well, the trio I was looking at was now just the adult pair and they no longer wanted to interact with me or anyone else for that matter. Can't blame them, their colt was taken from them and they were no doubt, pissed! We asked the guy we talked to earlier how much these donkeys had gone for the night before and he told us between 15 and 50 dollars each. WOW! I need to do more research before the next sale because I intend to be there. I am absolutely in favor of rescuing a pair or a few mini donkeys from a sale barn, but I'm feeling a bit concerned about buying a pig at a poke, so to speak. So here's my question. If the owner isn't available, what exactly do I need to check for when buying pet mini donkeys at a sale barn? I sure hope someone will leave a comment and help me with this question as mini donkeys and sale barns are not my area of expertise.
Subscribe to:
Posts (Atom)